
You might think mastering n8n is just about connecting nodes, but the reality is more nuanced. To truly harness its power, you need to grasp how workflows are structured, how triggers and actions interplay, and how best to handle data transformation and errors. Getting these fundamentals right can dramatically simplify your automation tasks, setting a solid foundation for scalability and collaboration. N8N Fundamentals forms a foundation where many users find unexpected challenges—and opportunities.
Key Takeaways
- Start workflows with appropriate trigger nodes to initiate automation accurately based on specific events or conditions in n8n.
- Design modular workflows using logic and code nodes for scalability, adaptability, and easier debugging.
- Use data mapping and transformation nodes to maintain clear, efficient data flow between workflow steps.
- Implement error handling with conditional logic and NoOp nodes to isolate issues without stopping the workflow.
- Create reusable templates with standardized naming, documentation, and version control to streamline collaboration and scalability.
N8N Fundamentals: Understanding the Core Components
To build effective automations, you need to understand n8n’s workflow structure and how nodes function together. Each workflow starts with a trigger node that kicks off the process, followed by action and logic nodes that handle tasks and control flow. Knowing how these components interact helps you create clear, efficient automation pipelines.
N8n Workflow Structure
You’ll start your workflow by setting up the trigger node, which kicks off the entire process based on specific events. Next, focus on data mapping strategies to guarantee information flows correctly between nodes for accurate outcomes. Mastering these steps helps you build efficient and reliable automation in n8n.
Trigger Node Setup
Although trigger nodes serve as the starting point of every n8n workflow, their setup requires careful attention to detail. You’ll customize trigger nodes with unique configurations to match your automation processes perfectly. Doing this helps you avoid conflicts and guarantees smooth execution. Mastering trigger nodes lets you confidently build complex workflows that truly reflect your team’s needs and ambitions.
Data Mapping Strategies
When building effective workflows, understanding how data maps between nodes is essential. In n8n, data mapping guarantees smooth shifts when you automate tasks across apps like Google Sheets. By linking each node’s output to the next input carefully, you maintain clarity and efficiency. Embracing these strategies helps you craft powerful, reliable workflows that truly connect and serve your automation community.
Essential Node Functions
You’ll start by choosing the right Trigger Node to initiate your workflow based on specific events. Then, use Data Transformation Nodes to shape and manipulate your data precisely before sending it onward. Finally, configure your outputs carefully to guarantee the results meet your automation goals.
Trigger Node Types
Anyone building automation with n8n must grasp trigger nodes because they kick off your workflows by responding to specific events or schedules. Whether you use Webhook to listen for HTTP requests or Cron to schedule tasks, trigger nodes control workflow execution. Mastering these lets you seamlessly connect apps and optimize your automation, making you a confident part of the n8n community.
Data Transformation Nodes
Data transformation nodes play an essential role in shaping and refining your workflow’s data as it moves between processes. Using nodes like the Function node and Merge node guarantees smooth data flow and boosts efficiency. Here’s how these nodes help:
| Node | Purpose |
|---|---|
| Function node | Custom JavaScript manipulation |
| Merge node | Combine data from multiple sources |
| SplitInBatches | Process large datasets efficiently |
Output Configuration Essentials
After shaping and refining information with transformation nodes, it’s time to focus on how your workflow sends data onward. Output configuration in an n8n workflow guarantees your data flow aligns with your goals. As workflows come alive, you’ll define outputs through Action Nodes, preparing data for AI agents or integrations. Testing outputs helps your community thrive by building reliable, adaptable automation.
Setting up and Configuring Your N8n Environment

To get started with n8n, you’ll first need to meet basic environment requirements and decide whether to install it locally or use the cloud. Once installed, configuring your workflow credentials properly guarantees smooth integration with external services. Let’s explore the essential steps to set up and configure your n8n environment.
Skip the learning curve. Our N8N expertise will configure your environment perfectly the first time—secure, optimized, and ready to scale.

Environment Requirements Overview
There are two main ways you can set up n8n: using the cloud-based n8n Cloud for quick access or self-hosting for greater control over your environment and workflows. When you choose self-hosting, following best practices guarantees stability and security. Pay special attention to properly configuring essential environment variables like N8N_HOST, N8N_PORT, and N8N_PROTOCOL for smooth operation. Also, setting up n8n behind a reverse proxy boosts performance and protection. To integrate services, enable required APIs such as Google Sheets or Gmail in your cloud console.
Visualize your setup needs:
- Access method: n8n Cloud vs. self-hosting
- Environment variables configuration
- Reverse proxy implementation
- APIs activation for integrations
Together, these steps create a solid n8n environment you’ll want to belong to.
Installing N8n Locally
When you’re ready to get hands-on with n8n, installing it locally offers a quick and flexible way to develop and test your workflows. Start by ensuring you have Node.js installed, then run `npx n8n` in your terminal to get up and running quickly. You’ll access your local n8n instance at `http://localhost:5678`, where you can create and experiment with workflows in a familiar environment. For smoother operation, set essential configuration variables like N8N_HOST, N8N_PORT, and N8N_PROTOCOL.
If you prefer, you can also run it locally using Docker, which simplifies management and scaling. To build confidence and troubleshoot easily, follow the official self-hosting documentation—it’ll guide you through setup and configuration, helping you join the growing n8n community with a stable, personalized environment.
Configuring Workflow Credentials
After setting up your local n8n environment, the next step involves configuring workflow credentials to securely connect your automation to external services. You’ll manage credentials in the dashboard’s “Credentials” section, ensuring smooth automation without authentication failures. Each credential, whether API keys, OAuth2, or Basic Auth, must match the service’s requirements precisely. n8n encrypts sensitive data like API keys, keeping your information safe.
Keep in mind to:
- Create or manage credentials for every service your workflow uses
- Verify each credential to prevent authentication failures
- Use encrypted storage for all sensitive information
- Configure environment variables properly if self-hosting for secure connections
Following these steps connects you confidently with your community of n8n users building powerful, secure workflows together.
Exploring Trigger and Action Nodes
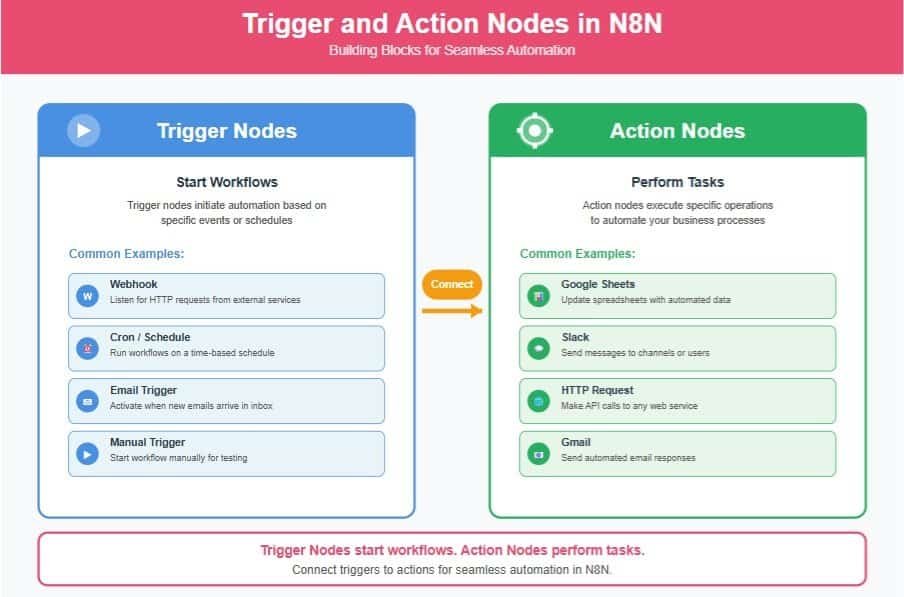
To get your automation started, you’ll need to select the right trigger nodes that respond to events like new emails or scheduled times. Then, you’ll connect common action nodes to perform tasks such as updating Google Sheets or sending Slack messages. Optimizing how these nodes interact guarantees your workflow runs smoothly and efficiently.
Selecting Trigger Nodes
Choosing the right trigger node sets the foundation for your workflow’s success in n8n. When selecting trigger nodes, you decide how your workflow looks and begins, shaping every action node that follows. You want to pick triggers that genuinely reflect the events to automate responses effectively. Keep in mind these key points:
- Identify the event that should start your workflow, like receiving an email or a scheduled time.
- Verify the trigger node aligns with your automation goals for seamless data flow.
- Think about how the trigger node will link to action nodes to maintain workflow accuracy.
- Choose triggers connected to sources that provide real-time, relevant data for timely automation.
Common Action Nodes
Once your workflow has the right trigger node to initiate actions based on specific events, it’s time to explore the action nodes that carry out the tasks you want to automate. These action nodes connect with services like Slack, Google Sheets, and Gmail, helping you automate repetitive tasks seamlessly. By configuring settings such as API endpoints and conditions, you gain dynamic control over how your workflows execute.
Using action nodes alongside trigger nodes creates powerful automation chains, letting you customize every step while maintaining clarity. Remember, each node’s precise configuration guarantees data flows efficiently, empowering you to build robust workflows with confidence. Together, trigger and action nodes form the backbone of your automation journey, making your processes smarter and more connected.
Optimizing Node Connections
Although trigger and action nodes each serve distinct purposes in n8n, optimizing their connections is key to building efficient, responsive workflows. When you focus on refining these links, you enhance data flow and guarantee your automation reacts exactly how you want.
Keep these tips in mind to strengthen your workflow design:
- Clearly define trigger nodes to activate workflows on precise events.
- Connect action nodes directly to trigger nodes for seamless task execution.
- Customize settings within each node to match your data formats and specific needs.
- Visualize node connections on the canvas to easily track and debug workflow sequences.
Implementing Logic and Code Nodes for Advanced Automation
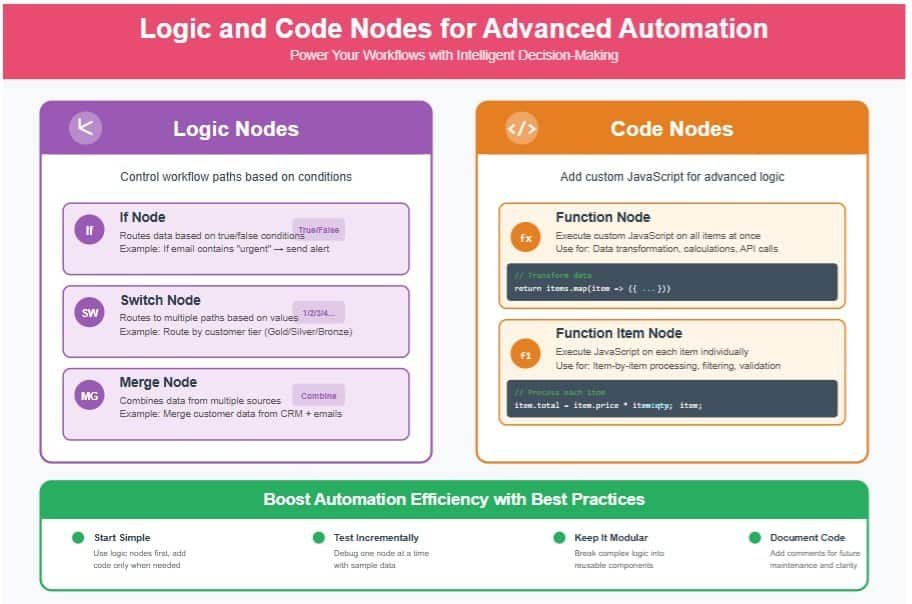
You’ll use logic nodes like If and Switch to create automated decisions based on conditions in your workflow. When standard nodes fall short, code nodes let you add custom JavaScript for tailored functionality. Combining these with solid error handling guarantees your automation runs smoothly and adapts to unexpected situations.
Our automation specialists design custom logic and code nodes tailored to your business—no trial and error, just workflows that work.
Conditional Logic Usage
When you integrate conditional logic in n8n workflows, you gain precise control over the flow of actions based on specific criteria. Using Logic Nodes like If and Switch lets you tailor each step, making your automation smarter and more responsive. You’ll handle complex processes smoothly by directing tasks only when conditions match, keeping workflows clean and efficient. Embracing modular workflow design with conditional logic enhances scalability and makes updates easier as your needs grow.
- Route tasks dynamically with Logic Nodes based on real-time data
- Simplify decision-making to avoid unnecessary steps
- Build reusable modular workflows for easy maintenance
- Scale your automation as business requirements evolve
Custom Code Integration
Since n8n supports custom JavaScript code through Code nodes, you can tailor your workflows with precise logic and data manipulation that go beyond standard nodes. Using custom code, you’ll handle complex tasks like transforming data formats or executing calculations directly within your automation. This flexibility empowers you to create workflows that seamlessly integrate with cloud services and external APIs, enabling dynamic real-time data processing. Logic nodes, such as If and Switch, complement Code nodes by defining clear, conditional paths, so your automation adapts intelligently. By integrating custom code efficiently, you enhance your workflows’ capability, making them both powerful and adaptable. Together, these tools help you build sophisticated automation that fits perfectly in your collaborative cloud environment.
Error Handling Techniques
Although errors can disrupt automation workflows, implementing robust error handling techniques in n8n helps maintain smooth operations. You can confidently design workflows that respond gracefully when issues arise by using error handling strategies involving logic nodes and custom JavaScript.
Enhance your automation with these methods:
- Use If and Switch logic nodes to direct workflow paths based on condition checks.
- Incorporate Code nodes to apply custom JavaScript for tailored validation and complex error checks.
- Utilize NoOp nodes to isolate and debug problematic workflow steps without halting execution.
- Regularly review execution logs to trace failures and refine error responses.
Together, these tools empower you to build resilient, adaptable workflows that keep your automation running seamlessly within our supportive n8n community.
Integrating AI Agent Nodes for Intelligent Workflows
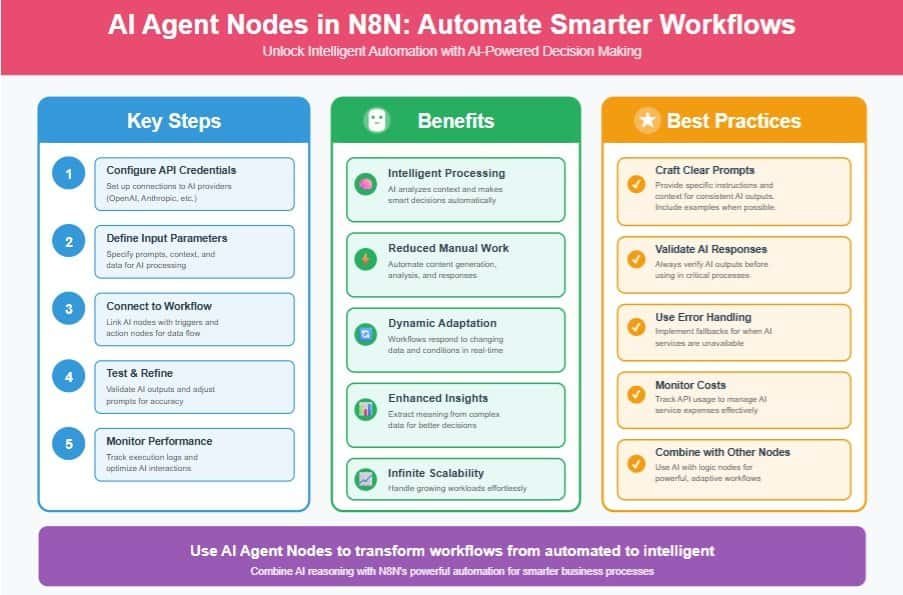
You’ll start by configuring AI Agent Nodes to handle complex tasks and automate decision-making within your workflows. Then, you can enhance your processes by leveraging AI to analyze data and adjust actions dynamically. Finally, managing the AI outputs effectively guarantees your workflow stays accurate and responsive to changing inputs.
Configuring AI Agent Nodes
When integrating AI Agent Nodes into your n8n workflows, you activate advanced automation capabilities that handle complex reasoning and decision-making tasks. Configuring the ai agent node correctly empowers you to create workflows that intelligently generate responses and reduce manual effort on repetitive tasks. Using n8n, you start by setting up API credentials to connect with AI providers smoothly. Then, fine-tune your node settings to analyze context and guide automation decisions effectively. Remember to test each step thoroughly to guarantee your flow runs flawlessly.
To configure your AI Agent Node effectively, consider:
- Setting precise input parameters for relevant AI outputs
- Connecting with existing nodes for streamlined data flow
- Defining decision branches to enhance adaptability
- Monitoring logs to optimize and troubleshoot
Welcome to a smarter workflow community!
Enhancing Workflows With AI
Harness the power of AI Agent Nodes to transform your n8n workflows into intelligent systems capable of complex reasoning and adaptive decision-making. By integrating these nodes, you enhance automation in workflows that handle tasks like social media content creation and lead management. This elevates your processes, allowing dynamic responses to new data and reducing manual work. As part of a community embracing innovation, you’ll appreciate how AI Agent Nodes foster flexibility and smarter decision-making.
| Benefit | Example |
|---|---|
| Adaptive workflows | Intelligent customer support |
| Automation enhancement | Social media content generation |
| Improved decision-making | Personalized lead management |
Embrace AI in your workflows and feel connected to a network of forward-thinking users driving smarter automation.
Managing AI Outputs
Integrating AI Agent Nodes into your workflows opens up powerful capabilities, but managing their outputs effectively secures those capabilities translate into real value. When you work with AI-driven automation, you want consistent, reliable results that serve your goals. To maintain control, keep these best practices in mind:
- Regularly test AI Agent Nodes to verify accuracy and relevance of outputs.
- Monitor workflows continuously to catch discrepancies early.
- Use outputs for enhanced data analysis, enriching insights and decision-making.
- Combine AI outputs with other nodes thoughtfully for flexible, intelligent automation.
Testing, Debugging, and Optimizing Workflows
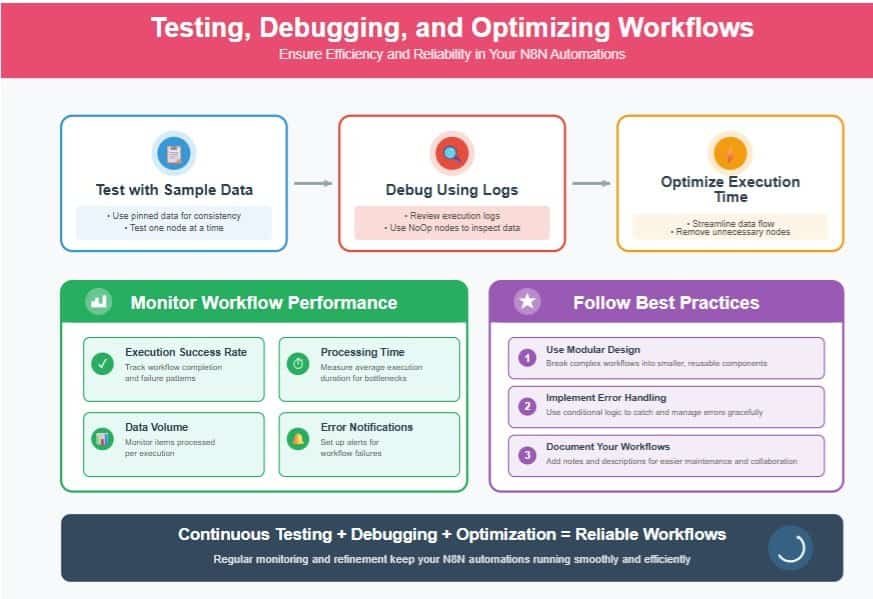
When building workflows, you’ll often encounter common errors that can disrupt automation. You can pinpoint issues faster by using effective debugging techniques like reviewing logs and testing nodes individually. To keep your workflows running smoothly, focus on performance optimization strategies that streamline data flow and reduce execution time.
From debugging existing automations to building enterprise-grade workflows from scratch—we handle the technical complexity so you can focus on results.
Common Workflow Errors
Debugging a workflow can feel like solving a complex puzzle, but testing one node at a time helps you pinpoint issues without getting overwhelmed. Start with a manual trigger to isolate the problem, then use execution logs to trace the workflow’s path accurately. Keeping pinned data consistent prevents fluctuating inputs from causing confusion, ensuring reliable results every time. When you structure your workflow modularly, you’ll find it easier to spot faults and update components without breaking everything.
Common errors you’ll want to watch for include:
- Overlooking node dependencies during debugging workflows
- Ignoring variable data changes without pinned data
- Skipping execution logs that reveal hidden errors
- Combining complex steps instead of modular design
Effective Debugging Techniques
Anyone working with n8n workflows knows the value of testing each step carefully to catch errors early. To boost your debugging efficiency, use n8n’s execution logs to pinpoint failures quickly. Modularly structured workflows make it simpler to isolate and fix issues without breaking the whole setup. Incorporate NoOp and Console nodes to inspect data mid-flow without interrupting executions, enhancing your understanding of the process. Pinning consistent input data throughout your tests stabilizes results and helps track down erratic behavior.
| Technique | Benefit |
|---|---|
| Step-by-step testing | Catches errors early |
| Execution logs | Detailed insight into failures |
| Modular workflows | Easier isolation and fixes |
| NoOp & Console nodes | Data inspection without disruption |
| Pinned input data | Consistent and reliable testing |
Together, these methods empower you to debug n8n workflows effectively and confidently.
Performance Optimization Strategies
Mastering effective debugging techniques lays the groundwork for boosting your workflow’s overall performance. To truly optimize, you’ll want to integrate targeted debugging and use tools like NoOp nodes for detailed data inspection. Keeping your workflows modular not only improves scalability but also simplifies pinpointing issues without disrupting the whole system. Regularly review execution logs to gain insights that drive smarter refinements.
Here’s how you can enhance your workflow optimization:
- Test incrementally with pinned data to keep inputs consistent and errors minimal
- Use NoOp nodes to pause and inspect at critical points
- Break workflows into modular workflows for easier debugging and clarity
- Analyze execution logs to identify bottlenecks or failure points
Together, these strategies embed precision and community-driven best practices into your automation journey.
Designing Modular and Scalable Automation Processes
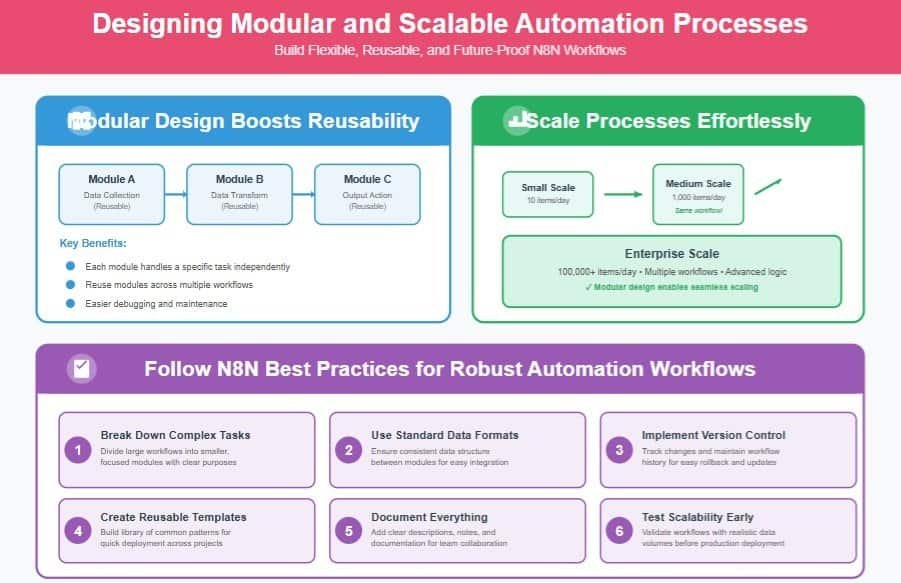
You can make your automations easier to manage by breaking them into modular workflow components that you can reuse and adjust independently. Focusing on scalability strategies lets you expand your processes smoothly as your needs grow. Starting with reusable automation templates saves time and keeps your workflows consistent across projects.
Modular Workflow Components
While building complex automation workflows, breaking them into modular components helps you manage each part more effectively. Modular workflows let you focus on a specific task in isolation, making your automation clearer and easier to update. When you create reusable components, you save time by applying them across different projects. This approach also promotes efficient troubleshooting since you can isolate and fix issues without disrupting the entire system. Plus, modular design prepares your workflows for future scalability.
- Break down workflows into manageable modules
- Assign each module a focused, specific task
- Reuse components across different automation processes
- Use standard data formats for smooth integration
Scalability Strategies
As your automation needs grow, designing workflows with scalability in mind becomes essential to keep processes efficient and manageable. Embrace modular workflows by breaking down complex tasks into smaller, clear components, making updates smoother as your needs evolve. Use trigger nodes smartly to respond dynamically to events, reducing the need for heavy rewrites. Incorporate logic nodes like If and Switch to guide multiple paths, keeping your automation organized and adaptable.
Regularly optimize workflows to maintain performance even as data volumes increase. While templates help speed up new projects, focusing on modular design and efficient triggers lays the foundation for reliable scaling. By adopting these strategies, you join a community that values both flexibility and precision, ensuring your automation grows seamlessly with you.
Reusable Automation Templates
When building complex workflows, reusable automation templates let you save time by creating modular, adaptable processes that fit multiple projects. Embracing these templates helps you foster scalability and streamline collaboration within your team. To master this approach, focus on:
- Standardizing naming conventions and data formats for clarity
- Utilizing version control to track improvements and collaborate smoothly
- Creating clear documentation to guide customization and usage
- Designing modular templates that easily integrate and expand
Applying N8n Best Practices Across Business Use Cases
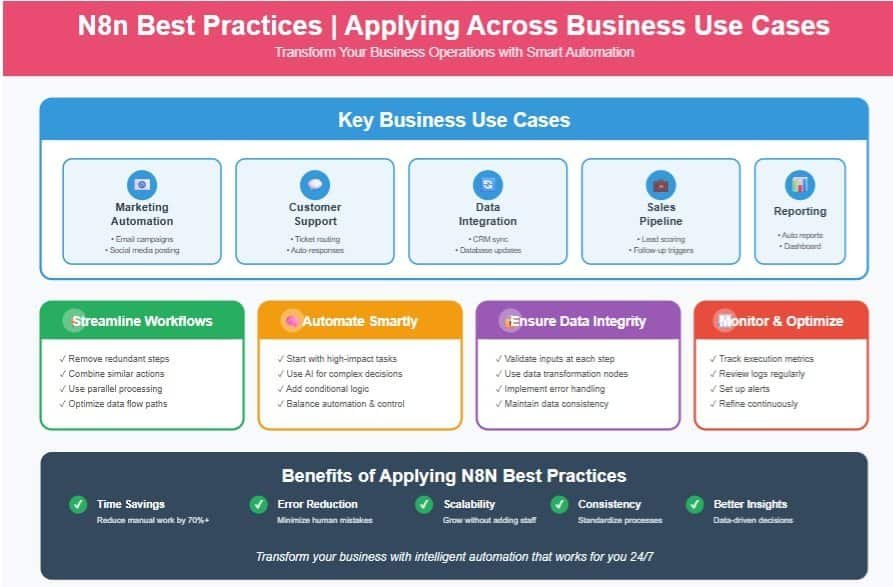
You can streamline your operational workflows by applying n8n’s best practices to automate repetitive tasks and reduce manual effort. Enhancing data integration efficiency guarantees your systems communicate smoothly, saving you time and minimizing errors. Let’s explore how these strategies can boost your business processes across different use cases.
Streamlining Operational Workflows
Although automating operational workflows with n8n may seem complex at first, focusing on best practices can simplify the process and boost your efficiency. You’ll want to start by identifying common use cases and breaking them into simple tasks. Next, leverage trigger nodes to kick off workflows instantly when events occur. Organize your workflows modularly, making each segment easy to adjust as business needs shift. Don’t forget to regularly check workflow logs to catch and fix issues fast.
Here’s how to streamline your operations with n8n:
- Begin with straightforward workflows to test integrations
- Use trigger nodes for timely automation
- Structure workflows modularly for flexibility
- Review workflow logs consistently to maintain smooth runs
This approach helps you belong to a community focused on clarity and adaptability.
Enhancing Data Integration Efficiency
Countless businesses face challenges integrating data from multiple platforms, but n8n’s flexible automation can simplify these complexities for you. By centralizing data management into streamlined workflows, you reduce manual errors and boost efficiency. For example, setting up a Google Sheets trigger automatically initiates actions when new entries arrive, turning data integration into a real-time process tailored to your needs.
You’ll love how logic nodes let you customize paths based on specific conditions, making automation smarter and more responsive. Regularly testing your workflows guarantees smooth operation and helps you quickly catch bottlenecks. By embracing n8n’s powerful connections across numerous apps, you’ll transform scattered data into a cohesive, efficient system that truly supports your team’s goals and sense of belonging within a productive automation community.
Frequently Asked Questions
How Do I Migrate Workflows Between Different N8n Instances?
You can export your workflows as JSON from one n8n instance and import them into another. This lets you share and migrate smoothly, keeping your automation consistent across environments without losing any important details or settings.
Can N8n Be Used for Real-Time Data Streaming Automation?
Yes, you can use n8n for real-time data streaming automation by setting up triggers that respond instantly to incoming data. You’ll love how it keeps your workflows connected and updated without missing a beat.
What Are the Security Implications of Using Custom Nodes in N8n?
Using custom nodes in n8n can expose you to security risks like unvetted code and data leaks. You should vet all custom nodes carefully, limit permissions, and regularly update to protect your workflows and community trust.
How Do I Handle API Rate Limits Within N8n Workflows?
You’ll monitor your API calls, implement delays, and handle errors gracefully; by doing this, you’ll respect rate limits, maintain workflow stability, and join a community that values smart, responsible automation without breaking any API rules.
What Are the Backup and Recovery Options for N8n Workflow Data?
You can back up your n8n workflow data by exporting workflows manually or automating database backups. Recovery involves importing these backups or restoring your database. This keeps your automation safe and helps you bounce back quickly.
Conclusion
Think of your n8n workflow as a well-tended garden—each node a seed carefully planted and nurtured. By mastering the fundamentals and best practices, you cultivate automation that grows resilient and fruitful, even as complexity blooms. With thoughtful design and ongoing care, your workflows won’t just function; they’ll thrive, adapting effortlessly to new challenges. Embrace this nurturing mindset, and watch your automation ecosystem flourish beyond what you imagined.